
To save a PowerPoint presentation to a USB flash drive, open the file and click “File” in the top-left corner. Choose “Save As,” select your USB drive as the location, and click “Save.” Safely eject the USB drive when done to ensure your presentation is portable and accessible.
Learn the simple steps to save it to a USB flash drive effortlessly. Want to ensure your PowerPoint presentation is portable? With just a few clicks, you can carry your presentation wherever you go, ready to impress your audience anytime.
Save your PowerPoint presentation to a USB flash drive in three simple steps. Click ‘File,’ select ‘Save As,’ choose your USB drive, and hit ‘Save.’ Now, your presentation is portable and ready to impress anywhere.
Putting a Presentation PowerPoint to USB Flash Drive
When it comes to making your PowerPoint presentation portable, transferring it to a USB flash drive is a straightforward process. Begin by opening your PowerPoint file and navigating to the ‘File’ tab. Click on ‘Save As,’ then choose your USB flash drive as the destination. After clicking ‘Save,’ your presentation is now securely stored on the USB flash drive.
This ensures convenient access and easy sharing of your PowerPoint masterpiece. To retrieve the file later, simply plug in the USB flash drive and open the presentation directly. With the simplicity of transferring PowerPoint to a USB flash drive, your presentations become effortlessly transportable and ready for any occasion. Don’t forget to safely eject your USB flash drive to ensure your data stays intact and accessible whenever you need it.
Create the PowerPoint Presentation
To begin, craft your engaging PowerPoint presentation with impactful visuals and informative content. Once satisfied, click on the ‘File’ tab and select Save As. opt for your PowerPoint USB flash drive as the storage location, then click Save. This seamless process ensures your dynamic presentation is ready to be transferred from PowerPoint to USB flash drive, ready to impress on any compatible device.
Connect the Flash Drive
To finalize the process of transferring your PowerPoint presentation to a USB flash drive, connect the flash drive to your computer. Insert it into an available USB port, ensuring a secure connection.
This step is crucial for successfully saving your PowerPoint file onto the USB flash drive. Once connected, proceed to save your presentation using the ‘Save As’ option, selecting the USB flash drive as the destination.
Copy the PowerPoint Presentation to the Flash Drive
Copying your PowerPoint presentation to a USB flash drive is a breeze. Open your file, click ‘Save As,’ and select your USB flash drive as the destination. This simple process ensures that your PowerPoint to USB flash drive transfer is quick and efficient. Now, your presentation is conveniently portable for sharing and presenting on the go.
Eject the Flash Drive
- Save your work: Before ejecting the flash drive, ensure all files and documents are saved to avoid any data loss.
- Close open files: Close any files or applications that might be using the flash drive, as active processes can interfere with the ejection process.
- Locate the drive icon: On your computer, find the icon representing the flash drive. This is typically found in the file explorer or on the desktop.
- Right-click the drive icon: Right-click on the flash drive icon. A contextual menu will appear with various options.
- Select “Eject” or “Safely Remove: Choose the “Eject” or “Safely Remove” option from the menu. This action signals the operating system to prepare the flash drive for removal.
- Wait for confirmation: After selecting “Eject,” wait for the system to confirm that it is safe to remove the flash drive. This confirmation may appear as a notification or a pop-up message.
- Physically eject the drive: Once you receive confirmation, physically eject the flash drive from the USB port. Some computers may have an eject button, or you can gently pull it out.
- Check for the green light (if applicable): Some flash drives have an indicator light that turns green when it is safe to remove. Ensure this light is no longer active before completely removing the drive to avoid potential data corruption.
Saving PowerPoint Presentation to a Flash Drive
Saving your presentation PowerPoint to USB flash drive is a crucial step for portability and easy sharing. Begin by opening your PowerPoint file and navigating to the ‘File’ tab. Click on ‘Save As,’ and choose your USB flash drive as the designated location for your presentation.
Ensure a seamless PowerPoint to USB flash drive transfer by clicking ‘Save.’ Now, your carefully crafted presentation is securely stored on the PowerPoint to USB flash drive, ready to be accessed and shared anytime, anywhere.
The simplicity of transferring PowerPoint to USB flash drive enhances the versatility of your presentations, making them easily transportable for various occasions. Don’t forget to safely eject your USB flash drive, ensuring the integrity of your data and making your PowerPoint to USB flash drive experience smooth and efficient.
Preparing to Save Your Presentation
| Step | Action |
| 1. Open Presentation File | Open your PowerPoint presentation file. |
| 2. Navigate to ‘File’ Tab | Click on the ‘File’ tab in the upper left corner. |
| 3. Select ‘Save As’ Option | Choose the ‘Save As’ option from the menu. |
| 4. Choose Save Location | Pick the desired location to save your presentation. |
| 5. Name Your File | Assign a relevant and memorable name to your presentation. |
| 6. Choose File Type (Optional) | Select the file type if different from the default. |
| 7. Check Compatibility (Optional) | Ensure compatibility if sharing across different versions. |
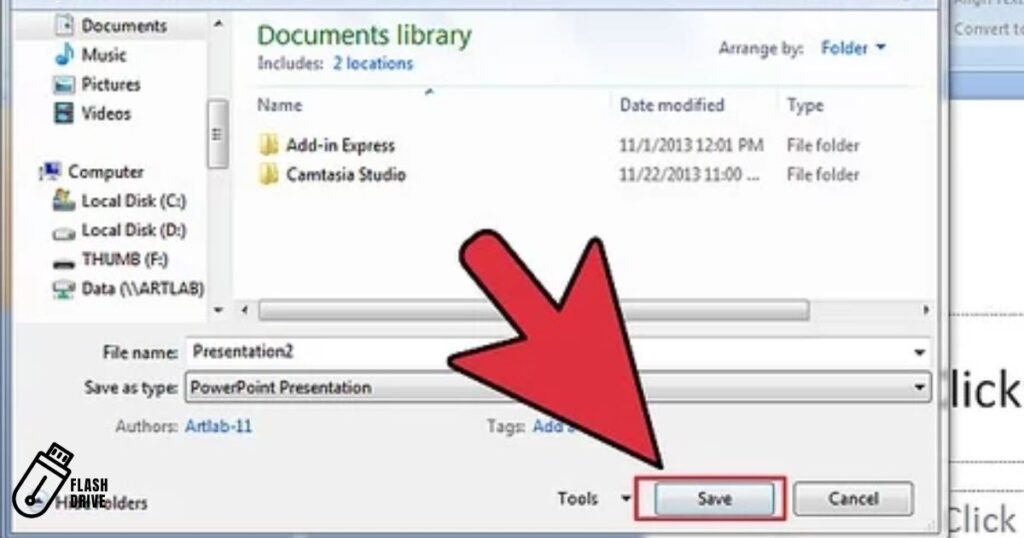
| 8. Click ‘Save’ Button | Confirm and save your presentation in the chosen location. |
| 9. Verify Saving Location | Double-check that the file is saved where intended. |
| 10. Close Presentation | Close the PowerPoint application to complete the process. |
Top of Form
Saving the Presentation
Saving your PowerPoint presentation is a breeze. Simply open your file, click on ‘File,’ and choose ‘Save As.’ Opt for your USB flash drive as the destination, and click ‘Save.’ This ensures a secure PowerPoint to USB flash drive transfer, making your presentation easily accessible on the go.
Taking Precautions to Keep Your Presentation Secure
- Password Protection: Secure your PowerPoint presentation by adding a password before transferring it to a USB flash drive.
- Encrypt Files: Use encryption tools to safeguard your files during the PowerPoint to USB flash drive transfer.
- Regular Backups: Keep backups of your presentation files on multiple devices, including the USB flash drive.
- Update Security Software: Ensure your computer has updated antivirus and anti-malware software to prevent any threats during the PowerPoint to USB flash drive process.
- Choose a Reliable USB Drive: Select a reputable and reliable USB flash drive for storing your PowerPoint presentations securely.
- Avoid Public Computers: Refrain from using public computers for PowerPoint to USB flash drive transfers to minimize security risks.
- Check USB for Malware: Scan your USB flash drive for malware regularly to maintain a secure environment for your presentations.
- Use a Dedicated USB Drive: Designate a specific USB flash drive solely for PowerPoint presentations to reduce the risk of contamination.
- Be Mindful of File Locations: Save and transfer your PowerPoint files only to trusted and secure locations on the USB flash drive.
- Educate Users: If sharing the USB flash drive, educate users about the importance of PowerPoint to USB flash drive security practices.
- Enable Auto-Lock: Set up your computer to automatically lock when idle, adding an extra layer of security during PowerPoint to USB flash drive transfers.
- Regularly Update Passwords: Change passwords for both your computer and USB flash drive regularly to enhance security.
- Physically Secure USB Drive: Keep your USB flash drive in a secure location when not in use to prevent unauthorized access.
- Review Permissions: Check and limit access permissions for your PowerPoint files on the USB flash drive to control who can view or edit them.
- Monitor USB Activity: Be vigilant about USB activities on your computer and set up alerts for any suspicious PowerPoint to USB flash drive transfers.
Naming Your Presentation File
Naming your presentation file is simple and essential. Choose a clear and descriptive name that reflects the content. Avoid using special characters or spaces to ensure compatibility. This makes organizing and finding your PowerPoint file on the USB flash drive quick and effortless.
Verifying the Saving Location
After saving your PowerPoint presentation to a USB flash drive, it is essential to verify the saving location. Double-check that the file is stored where you intended, ensuring easy access later.
This quick confirmation adds an extra layer of assurance, preventing any potential confusion or misplacement. Taking a moment to verify the saving location ensures that your presentation is readily available when needed.
FAQ’s
How do I save a PowerPoint presentation to a USB flash drive?
Open your presentation, click on ‘File,’ choose ‘Save As,’ select your USB flash drive as the destination, and click ‘Save.’
Can I use any USB flash drive to save my PowerPoint presentation?
Yes, you can use any USB flash drive, but it is recommended to choose a reliable and reputable one for secure storage.
Do I need to eject the USB flash drive after saving my presentation?
Yes, it is important to safely eject the USB flash drive to ensure your data is stored securely and prevent potential data corruption.
Can I password-protect my PowerPoint presentation on the USB flash drive?
Yes, you can enhance security by adding a password to your presentation before saving it to the USB flash drive.
What should I do if I can’t find my saved presentation on the USB flash drive?
Double-check the saving location, ensure the USB drive is properly connected, and verify that the file was not accidentally saved elsewhere. If issues persist, consider saving the presentation again.
Conclusion
In conclusion, saving your PowerPoint presentation to a USB flash drive is a straightforward process that enhances portability and accessibility. By navigating through the “File” tab and selecting “Save As,” you can effortlessly transfer your PowerPoint to a USB flash drive, ensuring your presentation is readily available for any occasion. This simple yet essential practice not only safeguards your work but also allows you to share and showcase your “PowerPoint to USB flash drive” versatility wherever you go.
Remember, the convenience of this process lies in the seamless steps of opening your file, choosing the USB flash drive as the destination, and clicking “Save.” With the power to password-protect your presentations and the flexibility to use any USB flash drive, this method offers a secure and efficient way to transport your creative work. Embrace the simplicity of saving your “PowerPoint to USB flash drive,” making your presentations not only impressive but also easily shareable and accessible on the go.