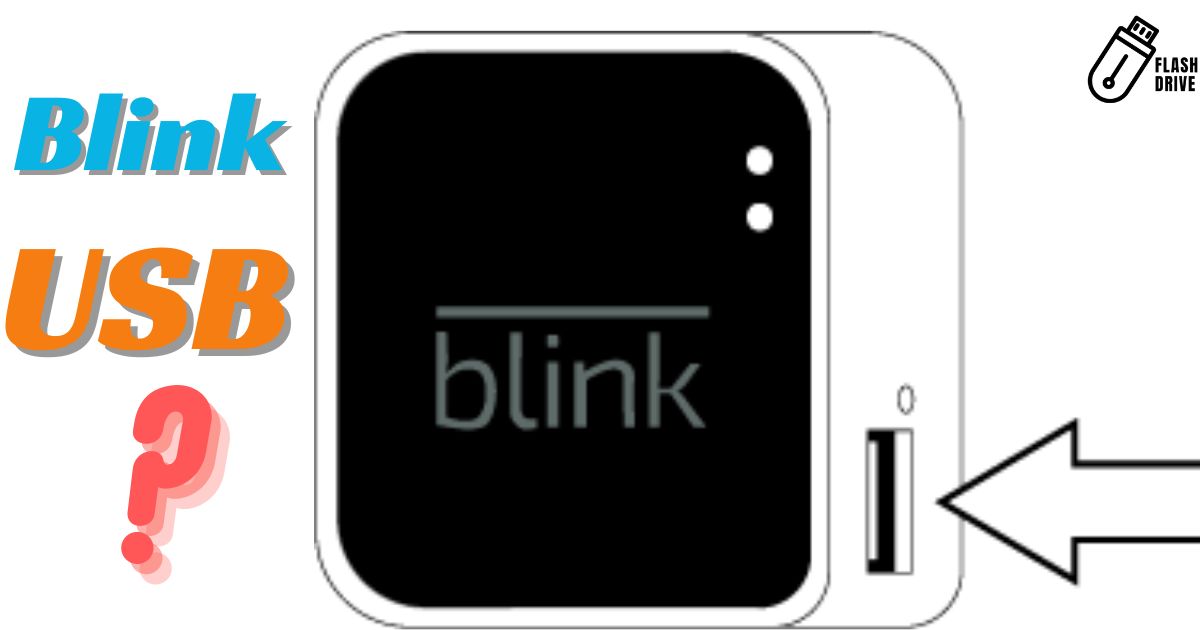
Using a Blink USB flash drive is simple. Insert the drive into an available USB port on your computer. Once connected, you can transfer, store, and access files by dragging and dropping or copying and pasting them to and from the flash drive. To safely remove the Blink USB, right-click on the drive icon and select “Eject” before physically unplugging it from your computer.
Unlock the power of convenience with Blink USB Flash Drive. Ready to Blink into action? Simply plug it into your device, and watch as seamless data transfer becomes a breeze. Experience the speed, simplicity, and security.
To use Blink USB flash drive, insert it into an available USB port on your computer. Wait for the device to be recognized, then simply drag and drop your files onto the drive. Safely eject the Blink USB flash drive when done by right-clicking on the icon and selecting Eject.
Understanding Blink USB Drive Specifications
When exploring the capabilities of the Blink USB flash drive, it’s crucial to understand its specifications. The Blink USB flash drive boasts varying storage capacities, ranging from 16GB to 128GB, catering to diverse user needs.
Its USB 3.0 compatibility ensures swift data transfer, while the compact design enhances portability. Additionally, Blink USB flash drives often feature robust encryption options, safeguarding your sensitive data. Familiarizing yourself with these specifications empowers you to make informed choices, ensuring the Blink USB flash drive meets your storage and security requirements seamlessly.
Navigating the Blink USB Drive Interface
Navigating the Blink USB Flash Drive interface is effortless. After inserting your Blink USB Flash Drive into a USB port, explore the intuitive interface by double-clicking the drive icon. Access your stored files by clicking on designated folders or create new ones seamlessly. The interface ensures easy file management, allowing you to copy, paste, or delete items effortlessly.
For added convenience, utilize the search function to quickly locate specific files. Safeguard your data by exploring the drive’s security features, and remember to eject the Blink USB Flash Drive safely after use. Experience a user-friendly and efficient file navigation process with the Blink USB Flash Drive, making data management a breeze.
Securing Your Data with Blink USB Drive
Navigating the Blink USB Drive interface is straightforward. Upon insertion, explore your files by opening the drive through File Explorer or Finder. To transfer files, drag and drop them into the desired folders.
Use the back and forward buttons to navigate between directories, ensuring seamless file management. To enhance organization, create new folders or delete unnecessary files directly from the interface. Safely eject the Blink USB Drive to complete your navigation experience.
Troubleshooting Common Blink USB Drive Issues
When encountering issues with your Blink USB flash drive, troubleshooting is essential for a smooth experience. Resolve common problems like connection issues or file transfer failures by ensuring proper insertion and using compatible ports. Safeguard your data from potential threats by addressing security concerns associated with the Blink USB flash drive.
Connection Problems
If your Blink USB Drive is not recognized, check the USB port for dust or damage. Try using a different port or cable, ensuring a secure connection for smooth operation. If issues persist, consider updating your device’s USB drivers.
File Transfer Failures
Encountering file transfer failures on the Blink USB Drive? Ensure a stable connection and try reinserting the drive. If the issue persists, check for corrupted files or use an alternate USB port for seamless file transfer.
Corrupted Data
Corrupted data on your Blink USB Drive may result in inaccessible or damaged files. To address this issue, consider running a disk check utility on your computer. Regularly backing up your important files can also help prevent data corruption.
Compatibility Challenges
Facing compatibility issues with your Blink USB Drive? Ensure seamless connectivity by verifying compatibility with your device’s operating system. If problems persist, check for firmware updates or seek assistance from the device manufacturer.
Security Concerns
**Security Concerns:**
Ensure Blink USB Drive safety by setting up a strong password to prevent unauthorized access. Regularly update the device’s firmware to patch potential vulnerabilities and protect against security threats. Avoid using the drive on untrusted computers to minimize the risk of malware or data breaches.
Transferring Files Between Devices with Blink USB
Transfer files effortlessly between devices using the Blink USB flash drive. Simply insert the Blink USB into the source device, locate your files, and drag them onto the drive. Once done, safely eject the Blink USB flash drive and plug it into the target device.
Access your transferred files instantly, streamlining data exchange between devices. With Blink USB’s plug-and-play simplicity, file transfer becomes a breeze, making it an ideal solution for seamless data sharing.
How to Fix Blink’s Local Storage Issues?
To resolve Blink USB flash drive’s local storage issues, begin by ensuring a secure connection between the drive and your computer. Check for loose connections or try a different USB port. If the problem persists, consider formatting the drive to fix potential file system errors. Updating your device’s drivers or firmware may also address compatibility issues.
Additionally, ensure that your Blink USB flash drive has sufficient free space by removing unnecessary files. If experiencing data corruption, attempt to recover files using available backup options. For persistent problems, consult the manufacturer’s website for firmware updates or seek technical support.
Refresh the Flash Drive Connection
To resolve Blink’s local storage issues, first, ensure a stable internet connection. Clear the browser cache or try using a different browser. If problems persist, consider updating Blink or contacting customer support for further assistance.
Restart the Sync Module
To restart the Sync Module, unplug it from the power source, wait for about 10 seconds, and then plug it back in. This simple step helps resolve connectivity issues and ensures the smooth functioning of the device. After restarting, allow a few moments for the Sync Module to initialize and reconnect to your network.
Reset the Camera & Doorbell
To reset your camera or doorbell, locate the reset button on the device. Press and hold the button for about 10 seconds until you see a confirmation light or hear a beep. This action will restore the device to its default settings, resolving potential issues.
Does Blink Offer Local Storage?
Blink USB Flash Drive does not provide local storage on the device itself. Instead, it serves as an external storage solution for your computer or compatible devices. The Blink USB Flash Drive allows you to conveniently store and transfer files between devices, offering a portable and secure option for data management.
While it lacks internal storage, it excels in providing an efficient means of expanding your storage capacity on the go. Users can enjoy the convenience of carrying important files without relying solely on their device’s internal storage. With Blink USB Flash Drive, seamless data access and transfer are prioritized, making it a valuable accessory for those seeking portable storage solutions.
What Happens When Blink Local Storage Is Full?

When the Blink USB flash drive’s local storage reaches full capacity, you may encounter challenges in storing additional files. The device wo not accept new data, prompting the need for immediate action.
To address this issue, consider deleting unnecessary files or transferring them to another location to free up space on your Blink USB flash drive. This ensures continued functionality and allows for seamless file management. Regularly monitor storage levels to prevent disruptions and optimize the performance of your Blink USB flash drive.
Where Is Local Storage on Blink App?
Locating local storage on the Blink app is simple. Open the app and tap on the menu icon, then select “Settings.” Within the settings, find the “Local Storage” option.
Here, you can manage and view the data stored directly on your Blink USB flash drive connected to your device. It provides easy access to your stored files, allowing you to organize, delete, or transfer data effortlessly. The local storage feature ensures that your Blink USB flash drive serves as a convenient and accessible repository for your files, enhancing your overall user experience.
FAQ’s
Where can I find local storage on the Blink app?
Navigate to the Blink app’s settings menu, then select “Storage” to locate and manage local storage options.
How do I access my locally stored files on the Blink app?
Simply tap on the “Local Storage” tab within the app to view and interact with the files stored locally on your device.
Can I customize the location of local storage on the Blink app?
Currently, the Blink app automatically designates local storage; however, you can manage and clear space through the app’s settings for a seamless experience.
Conclusion
Begin by inserting the drive into any available USB port on your computer. Once connected, your computer will recognize the drive, allowing you to effortlessly transfer files. After the transfer is complete, it is crucial to safely eject the drive to prevent data corruption. You can do this by right-clicking on the drive icon and selecting “Eject” before physically unplugging the USB Flash Drive.
Whether you are sharing documents, photos, or videos, this compact device offers a reliable means of carrying your important files with you wherever you go. Its plug-and-play functionality makes it accessible for users of all levels of technical expertise, ensuring a hassle-free experience when it comes to managing your data on the go.